
Unreal Substrate
I hadn't yet had a chance to utilize Unreal's new Substrate system for creating any 3D content. So I thought about a quick idea to put something together in the engine with the new material framework, inspired by a real-life model I have of the same material in my office.
It's important to note that Unreal's new Substrate system isn't something radically different to other renderers. Under the hood is the same type of shading system you'll find in other applications like Blender or Cinema4D. So if you're familiar with those, you'll already be familiar with Substrate.
What is important about Substrate and what it brings to Unreal is the following:
Well-integrated and built-in material blending system.
A much needed update to Unreal's aging shading model.
What is Forged Composite?
Forged Composite is a type of carbon fiber which is different than traditional carbon fiber. Instead of weaving large continuous pieces of carbon together, with Forged Composite, small pieces of carbon composite material are placed in random directions and encased in resin.
What's important for digitization, forged composite has a unique look which creates challenges for recreating this material for 3D rendering.
The Reference
I happen to have a sample of the material, which was gifted to me. This is immensely useful for recreating the material's marble effect.
I didn't want to match the reference precisely, instead I wanted to exaggerate its best aspects. Specifically the splattered marbling effect of the resin-encased pieces of carbon. I chose to ignore the reflective flakes in the resin.

On my sample, a flaked paint was sprayed on top of a satin-clearcoated forged composite. I decided this would be fun to recreate using Unreal's Substrate.
Aside from the marble appearance of the material, I did want to recreate the gradient painted effect on my real-life personal reference. This appealed to me because it would give me a chance to utilize Substrate's material blending system.
I would end up blending together 3 materials with Unreal's Substrate, one for the forged composite at the bottom, another for the clearcoat effect, and finally one for the paint which was the very top layer.
Recreation in Adobe Substance Designer

Substance Designer has become one of the primary tools for me when texturing assets, especially large scale production challenges and any kind of unique asset. Adobe Substance Designer and Painter are extremely powerful and they are perfect for any texturing need.
I'm not going to break down every aspect of how I created the spattering marble effect in the textures in this article. However, I am sharing the Substance file I created completely for free in a link below. Feel free to download it, check out how I did things, use it in your own projects.
Anisotropy and the Marble Texture
The key to recreating this material digitally is anisotropy. Anisotropy affects the direction of the specular reflection on a material. Without anisotropy, specular reflections travel uniformly in all directions.
Real life examples of anisotropic specularity can be observed in things like horse hair, or the readable side of a CD, and of course carbon fiber!

The industry has become a bit split on how to describe anisotropy in a material. Kind of like Beta-Max versus VHS, the industry is battling between Angle (grayscale) versus Directional (vector) maps to describe anisotropy. It seems like Angle anisotropy is winning out.
Free Substance Material!!
I get a kick out of giving away my work lately, so here is the Substance material I created for the demonstration.
In it, I also include a version of Dongkoon Yoon's Direction-Angle converter, which I modified to be more useful for my use-case. Unreal uses a simple float for anisotropy angle, but I wanted to also have the option of using a vector map (or anisotropy direction) in cases where I need that instead. So I included the converter.
Unreal Material
Thanks to Unreal's new shading model, adding anisotropy to a material is trivial. All that's needed is an understanding of what the effect is and how to apply it properly. I also blended two more materials on top of the base forged composite material, to achieve the clearcoat and the gradient paint, respectively. I go over how that's done below.
Material Blending

Substrate's material blending is handled by a variety of 'Operator' nodes that are all useful in different contexts.
From bottom to top, my material layering for this material is as follows:
Forged Composite
Clearcoat (Substrate Add)
Paint (Vertical Layer & Coverage Weight)
I use the 'Substrate Coverage Weight' node to blend the paint material over the top of all the other materials using a gradient.
The Base Material - Forged Composite
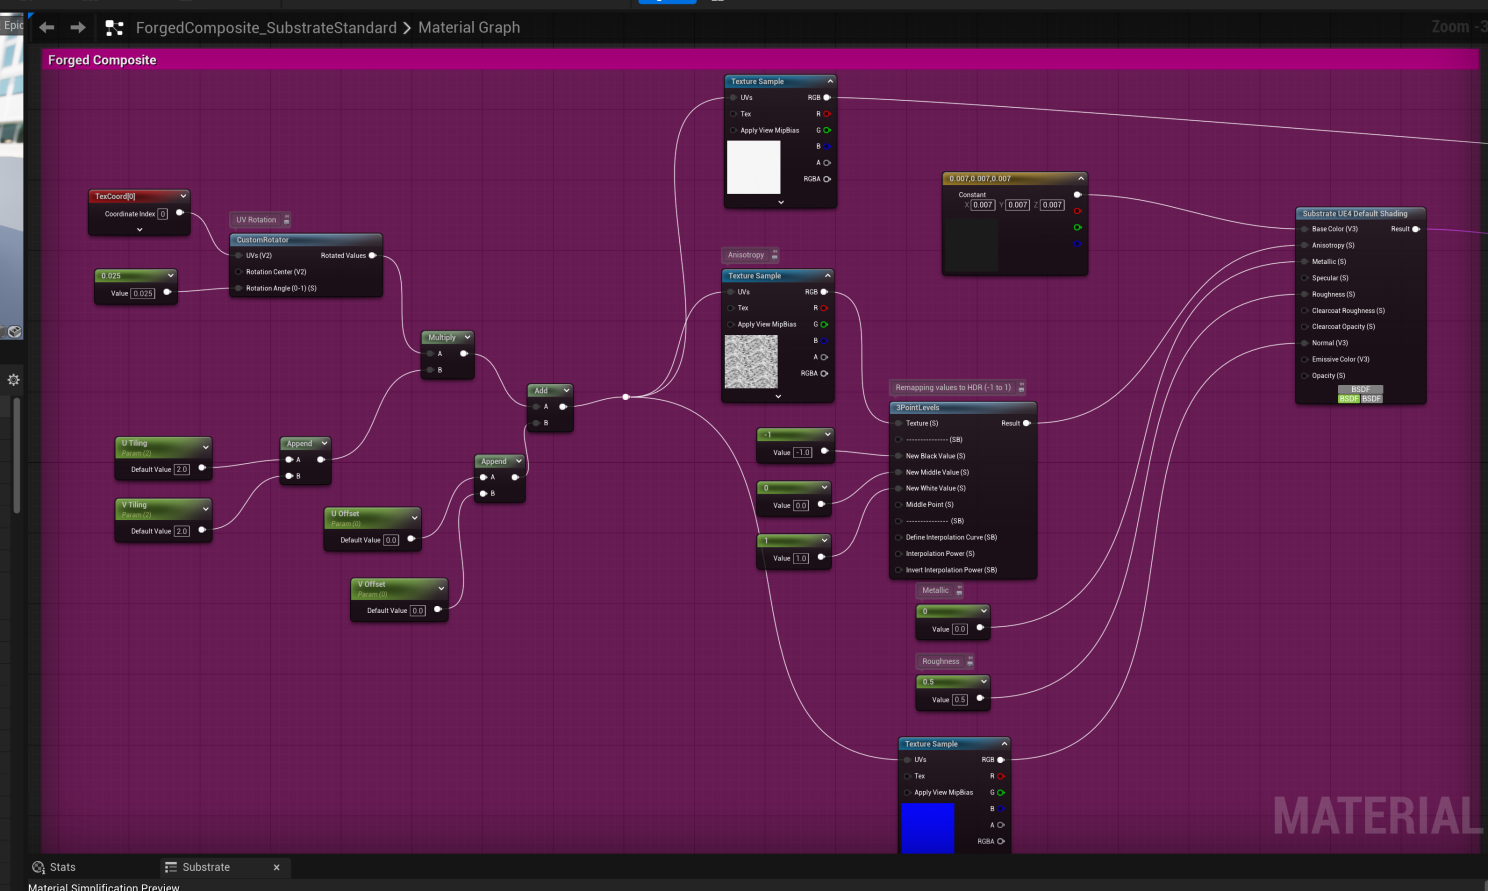
The implementation of the Forged Composite material from Substance into Unreal is pretty straightforward. The thing I found interesting was how anisotropy angle and anisotropy level is represented in Unreal's Substrate - I have never seen it done this way before.
Usually when I see renderers implement a greyscale Anisotropy Angle method, they'll have a separate texture/channel which provides the Anisotropy Level (or 'intensity'). But with Unreal Substrate, they chose to use an HDR map for Anisotropy Angle, with a range between -1 to +1. So -1 not only represents the angle/direction of the anisotropy, it also represents the intensity of that anisotropy in that direction, and +1 represents it in the opposite direction. Very cool!
Clearcoat

The new default shader in Unreal has built-in clearcoat parameters. However I found its effect to be unrealistic for my use-case. So for my shader, I chose to layer in a separate clearcoat using the Substrate Add node.
I believe the reason why the default clearcoat looks weird is because it's using the normal map from the base material in the clearcoat. But this isn't how clearcoat appears in automotive products. A smooth clearcoat is needed in these cases.
Unreal's documentation repeats warnings about using Substrate Add, generally advising developers not to use it. It's just important you don't add values/parameters from layers beneath it.
Though I found an issue with layering on top of clearcoat materials. When I layered the paint material on top of this clearcoat part of the material, I found this would cause artifacts in the material. This appears to be due to a limitation in Substrate - layering more materials above clearcoat can cause issues. To work around this, I reused the mask that I made for the paint material in the clearcoat coverage parameter. (Only when the paint effect is turned on.) This helps reduce, but not completely eliminate, artifacting issues for now. Later, I'd like to investigate using Substrate's Building Block nodes to re-architect this shader to see how else to achieve this material.
Painted Effect
I parameterized the paint color and a toggle, along with other parameters, to make it customizable per-instance.
The paint is pretty straight-forward, and although with the base material with forged composite I reverted back to the 'UE4 Default Shadeing' node, I kept the paint layer a Substrate Slab. I experimented with different root nodes to see if I got differentiated results, but all that I experimented with seemed to produce the same results, which is good.
Otherwise, the paint is basic. I should go back and re-adjust the reflectance values and otherwise polish it, but this wasn't the focus of this quick project so I just built it quickly. There's a couple of quick parameters for the paint, such as to control the color, or to completely remove the paint and only have the forged composite + the clearcoat, if the user desires.

I procedurally created a gradient for a mask to blend the material instead of making a texture specific for the UV's of my model. This reduces drawcalls while also making the material more universally applicable, rather than specific to one model's set of UV's.
Conclusion
Unreal's Substrate brings a modern shading model, and more importantly, a powerful shading framework to give users as much potential flexibility in creating materials as they would in an offline renderer like Blender, Cinema4D, V-Ray, etc. This is very powerful!!
Keep in mind, unlike traditional offline renderers, Unreal is real-time, which means it comes with performance/hardware constraints. What platform are you developing your shaders for? This is something you have to keep in mind as you develop Substrate shaders. They may not support the complex shaders you want to create. So either you'll have to work within those constraints as a limitation, or build multiple shaders as fallbacks when users with lower hardware try to run your game/application.
If you need an even deeper understanding of the concepts I described in this article, or are looking to hire an expert material artist for your project, I'm open to Linkedin DM's and e-mails for inquiries.